I was trying to do something that wound up being much harder than it should have been – consuming Google’s APIs from .NET code. This will be the first in a series of posts about using Google APIs. Specifically, I was interfacing with the Google Drive API, and I will go into greater depth on that interactions and some of the problems and gotchas into which I ran and other things you should know in later posts. The first step in dealing with Google from your code is authenticating, either just your application or your application and the user of the application via OAuth with Google.
Using OAuth with Google APIs is pretty well documented and described in a blog post by Linda Lawton. It appears she’s pretty well-versed in interacting with Google from code and has a lot to offer. There were a few things missing from her post that I want add and a few things I thought could use an update to make for an improved help resource, though. Also, her example shows using a Windows Forms application as the sample bed for doing authentication. It’s probably more broadly useful to show an example using ASP.NET MVC, as this is probably a much more common type of user interface for most .NET applications. Linda also has another post (linked from the one I already mentioned, so this may be redundant), that doesn’t use a client library and digs a little deeper into writing the code to create, send, and handle the requests associated with the OAuth interaction and gets a little more into the nuts and bolts of how OAuth works. I recommend it and it’s worth a read. You can get by without understanding what is going on in the protocol, but it’s better for you if you get it and a day will come when you’ll be glad you took a moment to understand. I love these types of posts – well done, Linda.
To get started with using the APIs, you need to register an app with Google. By doing this, you will get a Client ID and a Client Secret you can use to authenticate the application. Registration and retrieval of your information are done in the Google Developers Console.
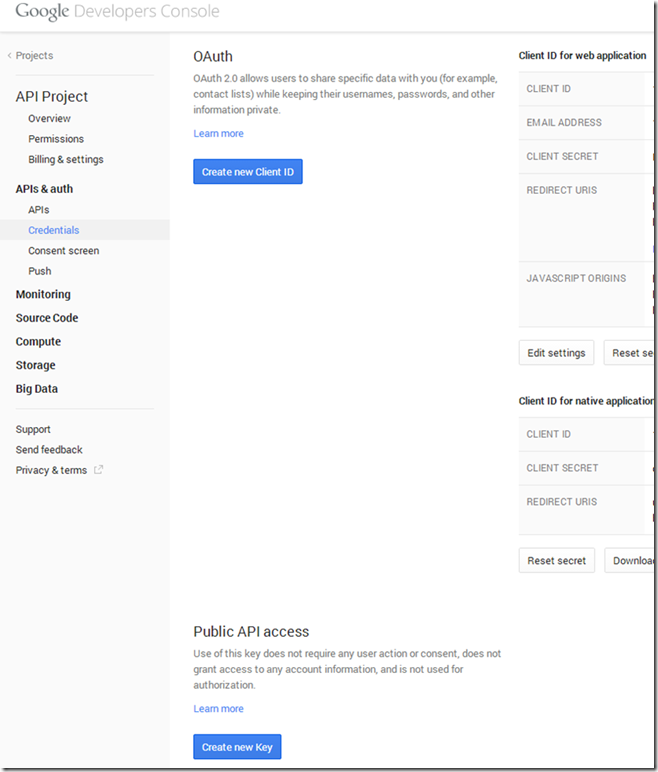
Upon going to the Developer Console, you will see a menu on the left side. Under APIs and auth, there is a link for Credentials.
Clicking on that will show the page depicted above. You’ll notice that you can create a new Client ID for a new application and that it shows your existing applications. Note that this isn’t the entire page and the actual information for your account and application(s) are to the right – I didn’t want to share my information and my client secret. There does not appear to be a limit on how many applications you can create, but I haven’t put this to the test. Applications created can be a web application, a service account, or an installed application (typically a native desktop or mobile application). For our purposes here, we will not be addressing service account type applications and focusing only on using web and/or native applications, and especially on web applications.. There are some differences in how these are used, based on which type you are selecting, but most of what we’ll cover will be pretty uniform. The most interesting items here are the Client ID and Client Secret. We’ll need these to connect to the API and authenticate users to be able to access the information in their Google Accounts. We’ll also need to return to this page to configure (or just copy the Client ID and Client Secret now and have them available on our clipboard (if you aren’t using a tool to keep multiple items on your clipboard and be able to paste from several copies ago, you should be – I love ClipX, even thought it’s a little less awesome with Windows 8 than with 7)) how our authentication works with the requests that come to our site after Google does the authentication and authorization negotiation with the user and then redirects back to the site on which we’ll use the information.
After having set up our application with Google, we are able to start writing some code. In order to interact with the Google APIs from an ASP.NET MVC application, we need to be able to get authentication and authorization from Google via OAuth. The code in Linda Lawton’s tutorial was useful to us in starting to understand what we need to do and it could probably be shoehorned into an ASP.NET application, but there are challenges to that and it doesn’t work without some significant effort. There is a better way, though, in this context. Google’s document on the subject is useful here and there’s a more complete example on Eyal Peled’s blog. He appears to be the Google employee responsible for the .NET client libraries provided by Google for their APIs. It is his name that is on the Google APIS Nuget packages.
With an ASP.NET MVC project in place, the next step is to start installing Google’s packages to help us with interacting with the APIs. There are a lot of package for a lot of available APIs. As far as I have seen, and as you would expect, all the packages for the individual APIs depend on some core packages (Google.Apis and Google.Apis.Auth). You will want to install the package(s) for the API(s) you are going to use and you will get the needed support from the core packages automatically (via the magic of Nuget). For example, if you want to use the Gmail API, you could issue, from the Package Manager Console:
Install-Package Google.Apis.Gmail.v1
If you want to use the Google Drive API, which was my interest, you would issue:
Install-Package Google.Apis.Drive.v2
In addition to installing the package for the API you’ll use in the application, there is another extremely useful package to add for an ASP.NET MVC application, the Google APIs Auth MVC Extension:
Install-Package Google.Apis.Auth.Mvc
These packages have a chain of dependencies and having added both the mvc auth package and the drive package results in the following diff showing a large number of installed packages:
With these packages installed, we can mostly follow the documentation on the Google Developers site and Eyal’s post, with a few necessary deviations.
There are two classes needed to make the authentication work with ASP.NET MVC. Google has kindly provided an implementation of a base class for a controller for authentication, as well as another class on which the controller depends to do the OAuth handshake. As an ASP.NET MVC developer, all you have to do is extend those two classes with your own implementations.
The class on which the controller depends is called FlowMetadata. The purpose of this class is to provide context to Google authentication in the application to enable proper OAuth access. It does this via properties – it provides a user name to associate with the credentials that get stored for authenticating to Google and and instance of IAuthorizationCodeFlow, which manages metadata and context regarding the application’s connection with Google – things like the Client Id and Client Secret we registered earlier.
 private static readonly IAuthorizationCodeFlow CodeFlowInstance =
        new GoogleAuthorizationCodeFlow(new GoogleAuthorizationCodeFlow.Initializer
        {
            ClientSecrets = new ClientSecrets
            {
                ClientId = "xxxx",
                ClientSecret = "xxxx"
            },
            Scopes = new[] { DriveService.Scope.Drive },
            DataStore = new FileDataStore("Just Messing Around - Wouldn't Really use a FileDataStore in a MVC application")
        });

    public override string GetUserId(Controller controller)
    {
        return "dude";
    }

    public override IAuthorizationCodeFlow Flow
    {
        get { return CodeFlowInstance; }
    }
}
In addition to this class, you need to provide a controller that will respond to the request issued from the browser upon the user successfully authenticating with Google and successfully granting your application access to the Google account via OAuth. The Google.Apis.Auth.Mvc package makes it really easy to do this by just extending a base controller, called AuthCallbackController. There is a single property you need to override to return an instance of your FlowMetaData subclass and you’re done.
public class AuthCallbackController : Google.Apis.Auth.OAuth2.Mvc.Controllers.AuthCallbackController
{
    protected override Google.Apis.Auth.OAuth2.Mvc.FlowMetadata FlowData
    {
        get { return new GoogleAuthorizationFlowMetadata(); }
    }
}
FlowMetaData also has a property that can be overridden to use something other than default AuthCallbackController. By overriding the AuthCallback ((string) property, you can tell Google to send the user back to another route.
That is the end of how authentication happens with the Google APIs, but it is really only the beginning. At this point we have authenticated the user and they have granted us access to what we requested to be able to use on their behalf with Google. The next step is to actually do something with that access. That will be the topic of future posts.


